- Display a dialog when the user approves an image
- Changing A Mockup URL Slug
- Extending Backbone Models, Views and Collections
- Adding Custom Scripts and Styles
- ph_website_publish_thread
- New Comment Threads
- Add additional notification emails
- Display a welcome message for new users on mockup projects
- Change the subscribed user email based on a role
- What are dashboard sites?
- Adding A Client’s Non-WordPress Site
- Adding A Client’s WordPress Site
- Adding A New Website Project
- How to use SureFeedback on a non-WordPress Site
- SSL and HTTPS
- Website Settings
- What is a project access link?
- Access Links Not Working
- Widget Not Showing on Client Site
- Changing A Website or Page URL
- Flywheel Client Site Cache Exclusions
- WPEngine Client Site Plugin Exclusions
- How to use Really Simple SSL with SureFeedback
- Viewing and Commenting on a Live Website
- Sharing a Website Link
- How Private Comments Work
- Introducing Comment Status in SureFeedback
How Private Comments Work
With SureFeedback, you can keep all communication related to your project in one place. Now, with our new “Private Comments” feature, the same goes for communication within your team.
Your team can post private comments visible only to your authorized user roles. This document will show you how this feature works.
How Private Comments Work?
In SureFeedback settings, you can define which user roles can see and write private comments. Then, you can assign the user roles to specific project members, for example, and that’s it.
Let’s show you how to do this:
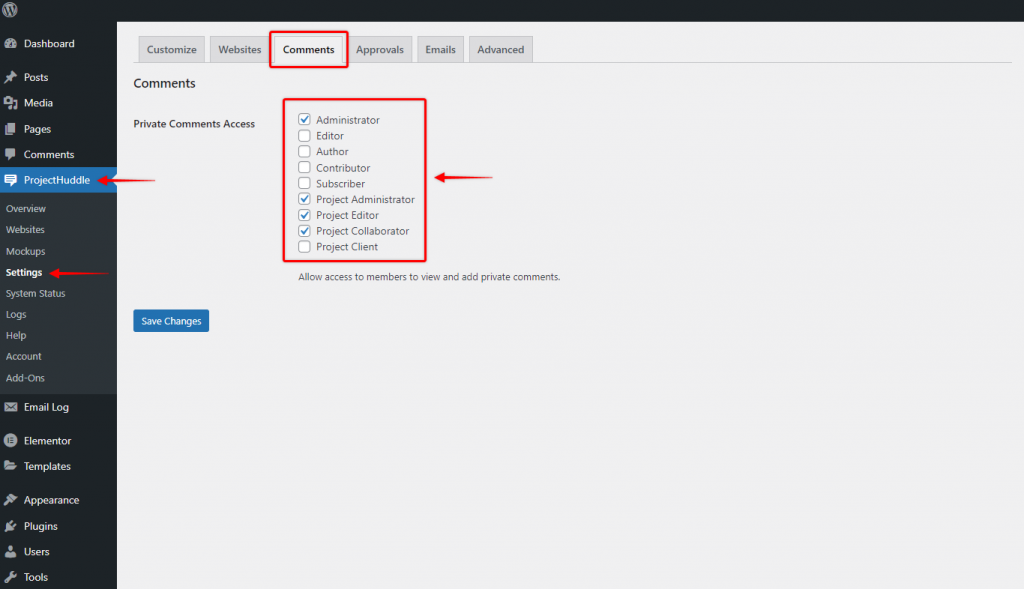
Step 1 – Log in to your main website and navigate to Dashboard > SureFeedback > Settings. Here, click on the “Comments” tab;

Step 2 – Check all the user roles that should have access to private comments;
Step 3 – Click “Save changes” to apply limitations.
Next, to post a private comment on your connected project website, follow these steps:
Step 1 – Log in to your connected project website;
Step 2 – Click on the existing thread (conversation) where you want to add a comment;
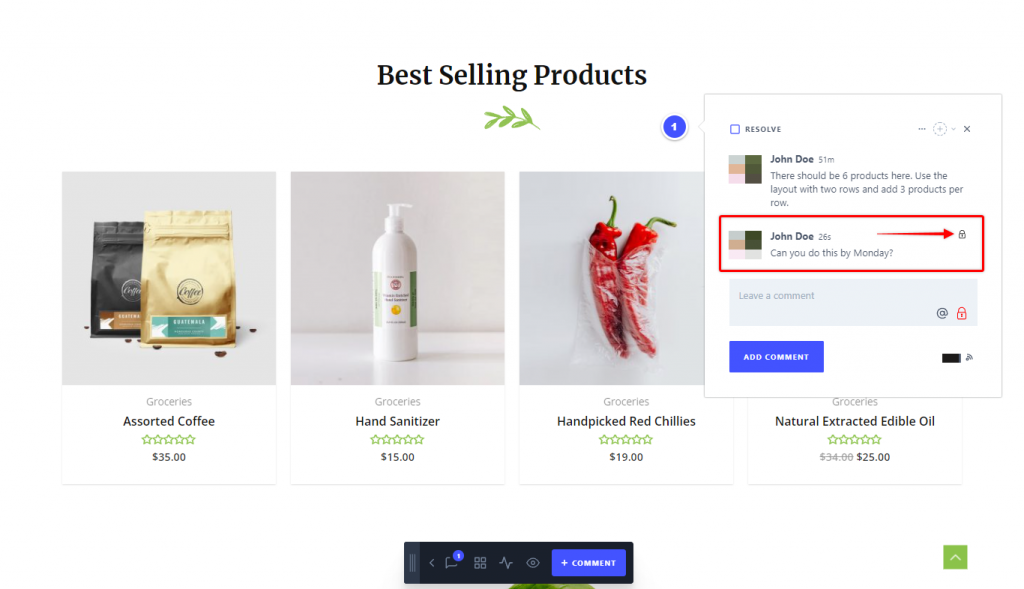
Step 3 – In your typing area, click on the “lock” icon to switch to private comment;

Step 4 – Type in your comment and click “Add Comment”.
You will know which comment is private buy the “lock” icon added to its top right corner.

To illustrate, you could use this feature to communicate with your team privately in the thread while the client sees only public comments.
Keep in mind that this feature is not available for thread starter comments (the first comment in each thread). Thus, if you’re starting a new thread, that first comment must be public. Further, the “lock” icon (a private comments switch) will become available to team members when adding comments to this threat.
Once you or any team member adds a private comment, only team members with access will be notified. Also, these messages will be omitted from the conversations when accessed by users with any other user role.
Further, user roles without access can’t add private comments. Accordingly, the “lock” icon, used to switch between public and private comments, will also be hidden from these users.
We don't respond to the article feedback, we use it to improve our support content.